So you’ve got yourself a nice tarp to go camping, hammock camping or for a little forest schools session… now how are you going to set it up?
The kit you will need:
- Tarp — 3X3m is standard, larger if more people or if severe weather expected. Standard weight is cheaper, the more you pay, the lighter the material.
- Cord: recommended for use as your tarp ridge line. I’ve used guy lines and old belts and bits of string, but paracord is fit for the job.
- Extra pegs and guy lines: As a minimum your tap will be held down in 4 places. A couple of extra pegs and guys gives you more flexibility if the wind gets up, if you want privacy, or you want to try a new set up.
- For the first time, two people deinitely helps — but with practice a simple hammock tarp set up will be up in minutes by yourself.
I’ve adapted the lists below from the DD website, as that’s the brand I sell. They are a British company, good price and good quality, but of course other tarps are available, and you can also make your own from rip-stop coated nylon. I like Rip Stop by the Yard, but I’m definitely still learning how to use a sewing machine!
There are a whole variety of set-up options possible with a standard 3X3 tarp, so here are the basics:
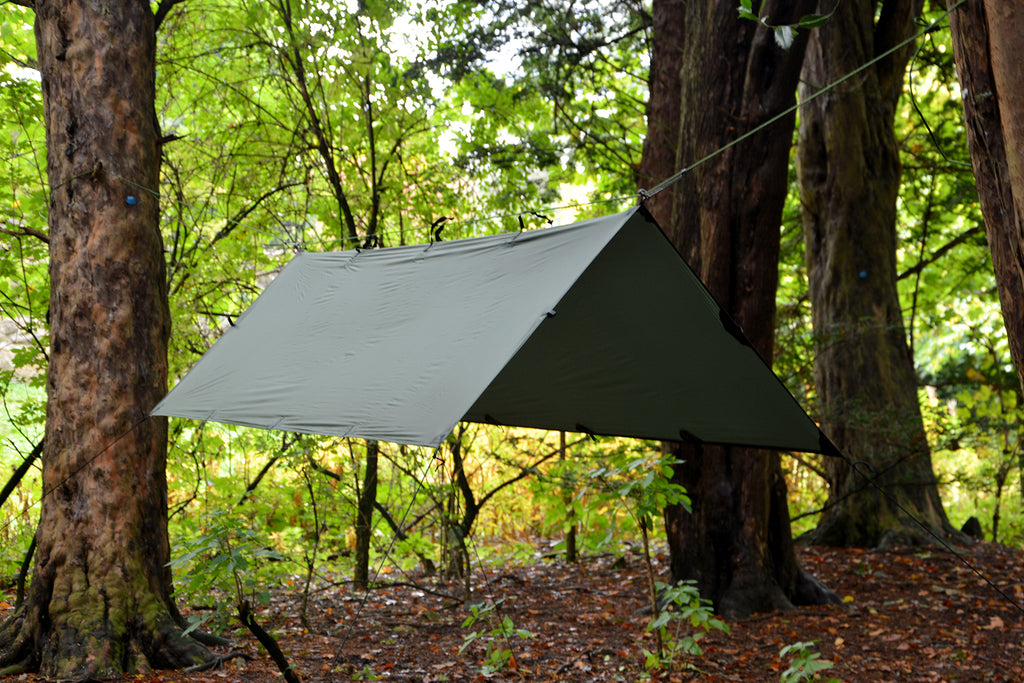
A-Frame: the most common set-up for hammock camping.
The tarp can be hung from a rope (ridge line) between two trees using the central attachment points on top. Once the centre line is in place the 4 corners can be pegged out using the guy ropes and then additional side points pegged out if required.
I often pag down to the ground on one side for privacy but fold back the tarp so i can see the sky…
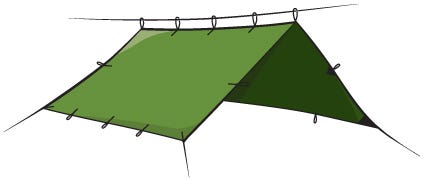
Diamond: End-to-end protection (suitable for square-dimensioned tarps only)
A useful set-up option for use with hammocks in windy conditions when rain can blow in from the ends.
Simply tie two corners to two trees or posts, and then using the pegs and guy lines peg the other two corners into the ground to create the diamond set-up as shown.
In very strong winds you can also tie out some of the other attachment points to create a solid shelter.
Lean-to: Great for shelter or cover when bivy camping.
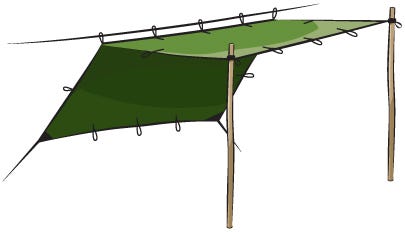
Various lean-to shelter styles can be created by pegging one side of the tarp down to the ground, and using the rest of the attachment points to increase the height or the amount of roof cover. Useful if you are on the move, the lean-to shelter can be set up in minutes and provides a great shelter for lunch or rest stops.
Do share your photos of adventures with us!
Check out all of our hammocks and tarps here: https://outdoorpeople.org.uk/collections/hammocks

